... weird, I know. Rhonda asked me to explain how I 'Avatar'ed' me. So I did in the comments - quick and dirty. I got back a big 'ummmm' - which I was assuming would happen if she didn't know Photoshop. Sorry Rhonda.
But today I have been playing with something that is of actual value and not just frippery. Not just tarradiddely. And thought - some of you have Photoshop, right? RIGHT? You've mentioned to me you wanted to learn - I remember you ...
OK, so go get a photo - and we are GOING TO HAVE SOME FUN!
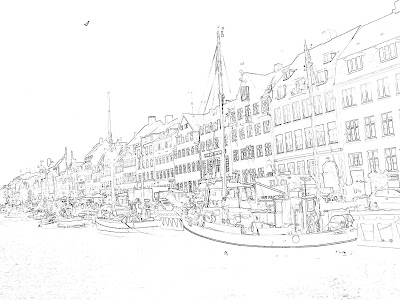
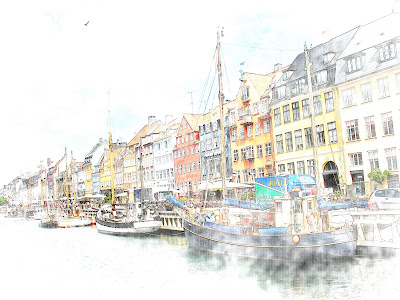
We are going to make a sketch out of a photo. I will show you the first steps, then at the end, you just play and experiment until you get a version you like. Cool? OK - if you are not going to play, just stop reading ... NOW!
I grabbed a photo of Nyhavn in Copenhagen, Denmark because I love the buildings and the ships. LOVE, LOVE, LOVE the place. 'Ny' = new 'havn' = harbour ... and, of course, like everything else in Europe, is freakishly old ...

But I digress (did I mention that I am frantically trying to avoid real life and thought this could take up a huge chunk of my day - panic attack free? Well, now we all know ...)
1) Open your file in Photoshop Elements (I am assuming you have 'elements' since it is not the full blown version but had most of the options and is perfectly fine - I have elements and the full blown version and I like to use each - for varying purposes).
OK, now here - if you are a MAC user - first of all - WIMP!! (kidding - Photoshop was designed for MACS - I'm just feeling defensive) translate all my [ctrl]
2) Hit [ctrl]
Two baby photos?
This is good.
(Whew! OK, this might be more difficult than I thought it was going to be ...)
3) On the top line select 'Filter' then in the drop down select 'Stylize' and from that select 'Glowing Edges'. You can move your photo around in the viewing area and get part of it to show that you care about. Adjust the sliders so that your lines are not too thick, not too thin - or just leave it and press OK. Your photo will turn into something that looks like this:

4) Hit [ctrl]I (for inverse) and it will 'Invert' the photo:

5) Now enter [ctrl][shift]U all together to take the color out ('desaturate' it):

6) Getting tricky - you need an 'adjustment layer' - just follow the steps:
In the layer palette - on the right - above your two photos (one now looking like a black and white sketch) there is a round circle - half white / half grey - click on it. In the drop down menu - select 'Levels ...'.
In the menu that pops up - there is a graph - see at the bottom of the graph there is a black, grey and white arrow? Take the black one and slide it slowly to the right and watch the black get blacker. Slide the white arrow to the left and watch the white get whiter. Make it look something like this:

7) We need a new layer folks. DON'T PANIC! In the layers palette on the right, click on the color photo (this will make that layer 'active'). Now click on the very first icon in the layers palette above all your little miniature layers - right next to the half grey half white circle - it is a square with one corner curled up. There - new layer. We need it white.
OK - on the Left side of the screen (unless you have dicked where all the menu items go - and then you will just have to call me) is the vertical toolbar. At the very bottom is two color chips. With a mini - black and white color chip below it (it is the very bottom icon). Make sure that White is on the top chip - if it is not, click on the mini - and it will set the chips to black and white, but in the wrong order - so right ABOVE the chips is a two headed arrow - click on that and it will swap the order and white will be on top. Hit [alt] [backspace] and it should fill the new layer with white. (The grid pattern that was there before means it is transparent)
8) Now, don't be frightened, but your sketch is going to disappear on this next step. First - in the layers palette - click on the sketch to make it the active layer - it should highlight it. Then go up to the line above that circle that is half gray / half white where it says 'normal' and click on the drop down arrow. In the list - select 'overlay' - and ... there goes your sketch!
9) Leave that for now - and go to the left hand side and click on the eraser tool (looks like a pink eraser). At the top of the page there will be a white square showing the design you are erasing in. The size of the eraser, etc. Click on the arrow of the white box. You will see a drop down of a bunch of 'brushes' - it is an eraser, yes, but really you are going to be 'brushing' with it. To the right of the rectangle labeled 'Brushes', there is an arrow - click on it and in the drop down menu, pick 'Dry Media Brushes'. There is a grungy looking sponge with the number 63 by it - click on it to select it.
Make the brush bigger or smaller by pressing the [ (bigger) or ] (smaller) and get it pretty big to start with. In the top were it says Opacity: - change the 100% to 20%.
In the layers palette - click on the white layer to make it active.
Now mouse over your sketch - which is a plain white blank slate - and you will see the outline of the brush - when I mean big - I mean BIG! You don't know where anything is right now - so make it, say 1/16 the size of your sketch. Now hold down the mouse right click brush and sweep the mouse over the white sheet. You should see your sketch start to appear. Keep brushing until you see a bit more.
This one, I believe I left on Overlay
To Change it, select the SKETCH layer then go up to the line that says overlay and click on the arrow - it is important that you have the SKETCH layer active or this will not work.
 I believe, if I remember right, I selected 'soft light' for this one:
11) Now - go to the top - click on 'Layer' and select 'Flatten Image' - if you don't do that, you can't save it as a .jpg and won't be able to see it except for in Photoshop. As soon as you do that - the layers in the right hand side layers palette all collapse into one.
12) All you need to do now is select 'File' - 'Save' - and save your file!See - it is rather easy for what you get out of it - a beautiful sketch of one of your very own photos!
I knew you could do it!
Note: coupla of things I just thought about -
1) If this makes no freaking sense, but you still want to do it: call me, bring your photo over, ask me to come over there - what ever - I am on a mission to spread the joy of Photoshop ...
2) I am assuming you read this whole thing through first (and now that I think about it, I am maybe only one of a few of you with two terminals so that you could have the instructions up while you worked in Photoshop ...
What I was going to say - when I say 'click on the sketch layer' - click to the RIGHT of the little baby picture. When you click on the picture it means something other than 'activate this layer' - I forgot to properly explain that ...


3 comments:
I love what you did and how you broke it down. I've got to get my hands on PS. How'd you learn?
Books, and a magazine that comes out every other month that has tips and tricks in it. Lots of time muttering to myself and being frustrated, but think I'm getting there ...
Here's the thing. I have NO idea what you are talking about. Furthermore, I have no interest in taking pictures of stuff. Even my kids. It just ain't me. BUT, I still read every line of these photoshop lessons. One, because it is actually very interesting to hear smart other people are, and two, because I just might miss a hilarious Lori in there somewhere. Totally worth it.
Post a Comment